How to Do Gel Nails at Home: Supplies & Step-by-Step Guide
Hi friends!

In the last like 6 months I decided that I was really over spending $70 to get my nails done just to have them last a couple of weeks and then having to go back and sit there again for well over an hour. Don't get me wrong, I love the feel of a salon gel manicure, but that price tag? Not so much, especially being in the pool almost daily here in Florida which makes them not last as long in my opinion. I was so happy when I realized that I could spend less than I do at one nail appointment on everything that I could ever need to be able to do my nails whenever I want! The good news? You can too and it is so easy! It’s easier (and more fun!) than you might think, especially once you have the right supplies and know the process, and practice a couple of times. Whether you’re brand new to gel nails or just looking to upgrade your at home setup, I’ve got you covered with everything that you will need! I love that each time I do my own nails, I get better at them and a little more creative plus I can watch whatever I want or listen to a book while I do them! So grab a coffee or a glass of wine and let’s turn your kitchen table into your own little nail studio!
**Please keep in mind that I'm not a professional nail technician. What works for me may not work for everyone, and if you have any questions or concerns about your nails or nail health, it is always best to consult a licensed professional on the topic**
Happy reading!
The Tools that I use
Gel Nail Polish – I have only tried the GAOY brand but that’s because I tried it and really liked it, they have SO many color options to choose from which makes me feel even more like I am at a nail salon to get my nails done. I will link all of the sets that I have below but each set is 6 different colors that cost about $10 on average for all of them but usually the price is even less than that!
Base Coat & Top Coat – Again, I have only tried this one brand but it has worked really well for me! The base coat and the top coat came in the same package which is nice and both of them were less than $10 and they also go on sale often.
UV LED Lamp – Before I got this UV LED Lamp, I had a much smaller one that would only cure one nail at a time and that was a complete waste of my time honestly and I quickly opted to get this larger lamp. I like this one because it was affordable and actually it goes on sale pretty often! I can also use it do my toes as well so I get more bang for your buck! This UV LED lamp has four settings for 5 seconds, 30 seconds, 60 seconds and then just on indefinitely until you take your hand out from under the lamp!
Nail File & Buffer – For this I have a couple of tools that I use to shape and prep my nail before I go in with the base coat. I like these nail files, and buffers came in a pack with a ton of them. I also like this electric tool that I use to buff and shape my nails and it saves time.
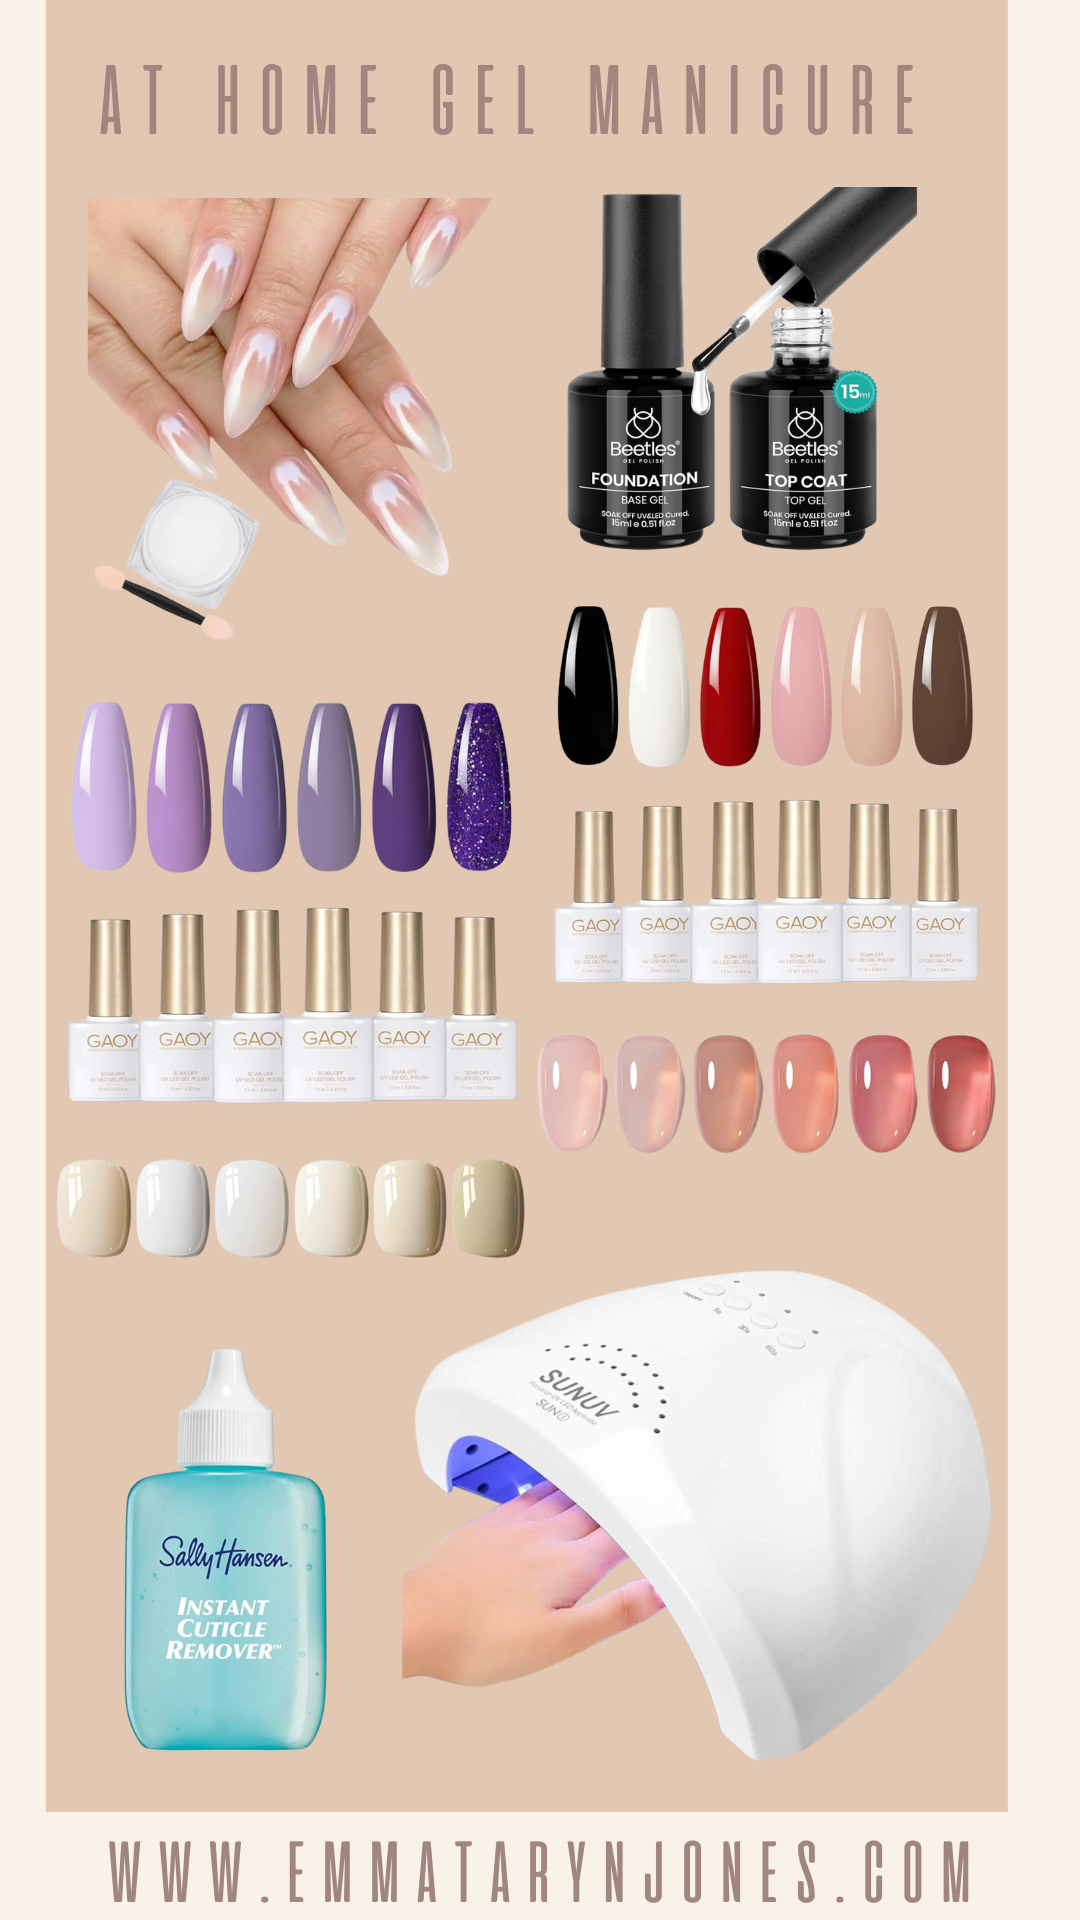
Cuticle Pusher & Clippers – Before I start to clean up my cuticles I put this Instant Cuticle Remover on my cuticles and let it sit for about a minute and then I start to push back and clean up my cuticles. This cuticle remover gel is a serious game changer! In my opinion, having cleaned up nail beds make my nails last longer and the gel polish has better adhesion. I use this tool to push back and clean up my cuticles but I recently discovered that my electric tool can also be used to clean up my cuticles. I use the electric tool if I am doing my nails quickly and don’t have to clean up much but if it has been awhile, I will use the instant cuticle remover and the non electric tool.
Optional/Extras:
Nail stickers, I got mine from Etsy - they have so many cute ones!


Step-by-Step: How I Do my Gel Nails at Home
Prep your nails – File, push cuticles, buff lightly
Clean and dehydrate – Wipe with alcohol or nail dehydrator
Apply base coat – Thin layer, cure under lamp! I do 60 seconds each time I cure anything from any step
Color coats – 1 to 2 thin layers, cure each time
Top coat – Seal and cure
Wipe with alcohol – Remove tacky layer
Moisturize – Cuticle oil for the win!
👉 Note: I know I kept saying thin layers but I really can’t emphasize enough to use thin layers and then cure each step for 60 seconds.

Troubleshooting & Tips for Long-Lasting Results
🚫 A Couple of Common Mistakes (and How to Fix Them)
1. Polish Lifting After a Day or Two
If your polish starts peeling or lifting early, it usually means one thing: poor nail prep. Make sure you’re fully removing oils by cleaning your nails with a dehydrator or primer before applying any product. Also, lightly buffing the surface of your nail will help the nail polish stick better.
2. Applying Polish Too Thick
Thick layers might seem like a time-saver, but they don’t cure properly under the lamp. It’s really just a mess that leads to bubbles, uneven texture, or polish that lifts right off. I can’t recommend enough to always apply super thin layers and remember that it’s okay if the first coat looks streaky. The second (and third, if needed) will even it out and it will look great!
🕒 Tips to Extend Wear Time
❌ What NOT to Do
1. Don’t Peel Off the Gel
When it’s time to remove the polish, as tempting as it is, trust me I know, don’t! Peeling the gel polish can rip up layers of your natural nail which makes them weak and brittle. If you can help it, always soak them off with acetone or use gel wraps or steamers to keep your nails healthy.
2. Don’t Pick at the Edges
If a tiny corner starts lifting, resist the urge to pick. Instead, file it smooth and seal it with a bit of top coat to make it last. Picking at the polish will really only shorten the time the polish will last.
3. Don’t Skip Curing Time
Even if it looks dry, under-curing can mean soft polish that peels later on which can be so frustrating. I suggest following the guidelines for your specific lamp when it comes to the time it takes to cure the polish.
4. Don’t Store Gel Products Near Heat or Sunlight
Take care of your gel polish and always store your gel polish in a cool, dark place & keep the bottles tightly closed between uses.
1. Cap the Free Edge
This is a game changer. If you gently run the brush along the tip of your nail when applying each of the layers. This will seal the edge and help prevent chipping from everyday tasks (typing, texting, etc.).
2. Avoid Water for the First Hour
Even after curing, I don’t know if this is real or made up in my head but I try hard to avoid doing things like washing the dishes or taking a shower for about an hour after doing my nails to keep the polish from lifting early.
3. Use a Nail Primer or Dehydrator (Optional but Effective)
If you have naturally oily nails or you’ve noticed that gel doesn't stay on long, a dehydrator or primer can help. It just helps to remove extra oils and helps the polish stay, especially helpful for humid climates.
4. Moisturize - But Not Before Painting
I use cuticle oil and hand cream regularly after I do my nails! I try to use cuticle oil every 1-2 days and lotion or hand cream everyday. It keeps your nails hydrated helps prevent cracking or peeling underneath the gel.


👋 How to Remove Gel Nails Safely at Home
Removing gel polish at home can feel like a whole extra step, but I promise it’s worth it rather than doing the peel-and-rip method 🙃).
🧼 1. File Off the Top Layer
Use a coarse nail file to gently remove the shiny top coat layer of your gel manicure. This breaks the seal and allows the acetone to penetrate more effectively.💡 Tip: You don’t need to file down to the bare nail, it’s really just until the shine is gone.
💧 2. Soak Cotton in Acetone + Wrap in Foil
Take a cotton ball or pad soaked in acetone, place it over your nail, and wrap each finger in a small piece of foil. This is just the same as if you would go to a nail salon. Some people use those reusable soak-off clips, I use small pieces of foil. I wait let that sit for about 10 to 15 minutes and then when the gel looks lifted and kind of flaky I know it is ready for the next step.
🧹 3. Gently Push Off the Gel
I use my cuticle pusher to gently nudge the rest of gel off my nail. It should come off easily, I haven’t had issues or needed to really scrape it off. If that does ever happen and it is still stuck you can rewrap your nail and then wait another 5 minutes or so before trying again. 🌿 Again, be gentle! Forcing it off can damage your natural nail, be patient with this step for sure.
🧴 4. Buff + Moisturize Like Crazy
The last step of this process once the gel is off I will lightly buff my nail to make sure it is smooth and get off any residue that is left. Then go in with cuticle oil and a really thick hand cream. Just keep in mind that acetone can be drying, so this is your nail’s moment for some major moisture!
❓ Frequently Asked Questions
🕒 How long does gel polish last at home?
When I do all of the steps correctly, my at home gel manicure at home can last about 10 to 12 days! They might be able to last longer but I am usually ready to change the color on my nails at that point so it never makes it longer. I really think that the key to success is in the prep work (clean, dry nails), using thin layers, fully curing each coat, and capping the free edge to avoid early chipping.
💅 Can I use regular nail polish with a gel top coat?
Honestly I never have but from what I understand, technically… yes you can, but with a catch that it will take quite some time. I believe that you can apply regular nail polish, wait for it to fully dry (we’re talking hours, not minutes), and then apply a gel top coat and cure it under a UV or LED lamp. I’ve never tried this but from what I have read, it needs to be fully dry before applying the gel top coat.

Like I said, it is so easy and really not complicated at all for me to give myself a salon quality gel manicure from the comfort of my own couch. Once you get the hang of the routine, it is so easy, it saves money and gives you total creative freedom over your nails. It’s okay if it’s not perfect the first time, mine absolutely weren’t but really just like anything else, practice makes it better. I really think that the convenience alone makes it so worth it. Plus, I feel so much more put together when I have my nails done! If you have any tips or tricks of your own please let me know, I’m always up for learning! If you have any questions at all you can also email me at hello@emmatarynjones.com and I will get back to you as soon as possible!
Emma